Ground-floor alterations: knock-through, new bathroom, and splitting 17 from 17A
17 & 17A Wilton Road, Salisbury SP2 7ED. The ground floor currently runs as one unit: a shop and old commercial kitchen at 17, and a flat at 17A. The works extend the 17A living room, add a bathroom, and build a proper boundary wall between the two properties.
Everything you need to price the job is on this page: the drawings, a numbered schedule of works, the bathroom specification with products, wall and floor build-ups, and site photos.
1. Drawings
GF-01 shows the layout today and GF-02 the proposal. The red numbers on GF-02 match the schedule of works below. Click either drawing to open the full A3 version.
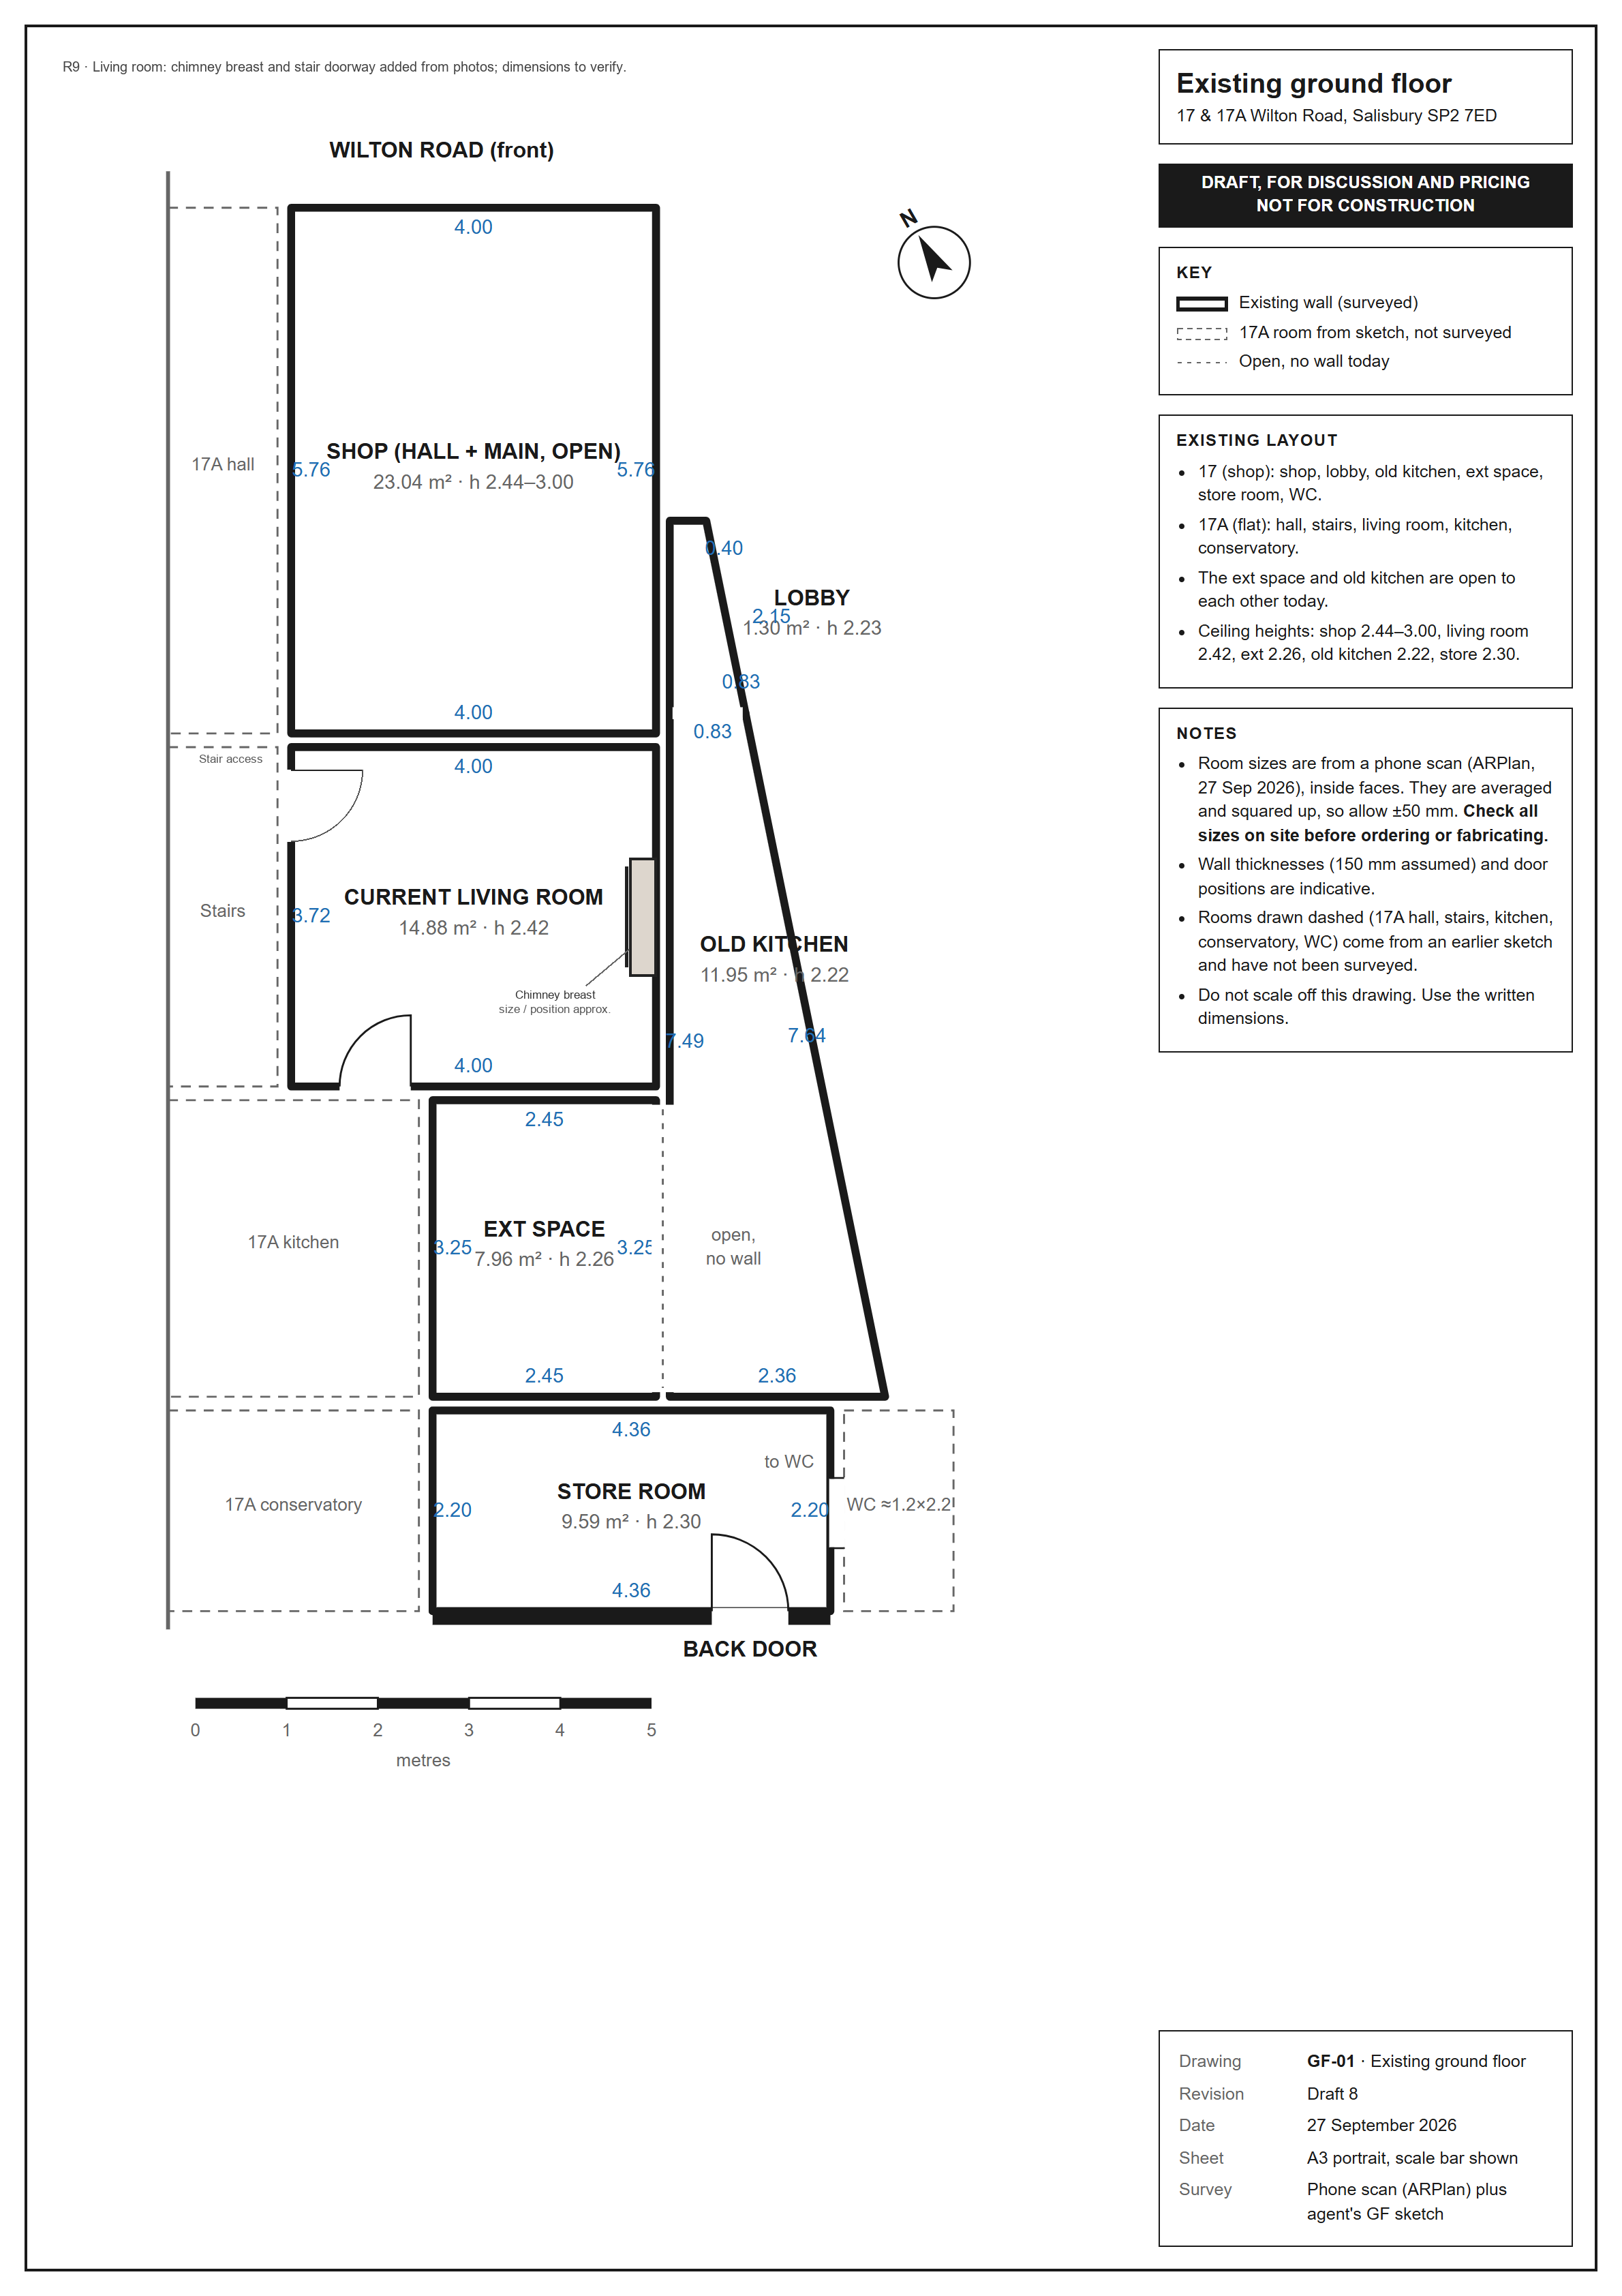
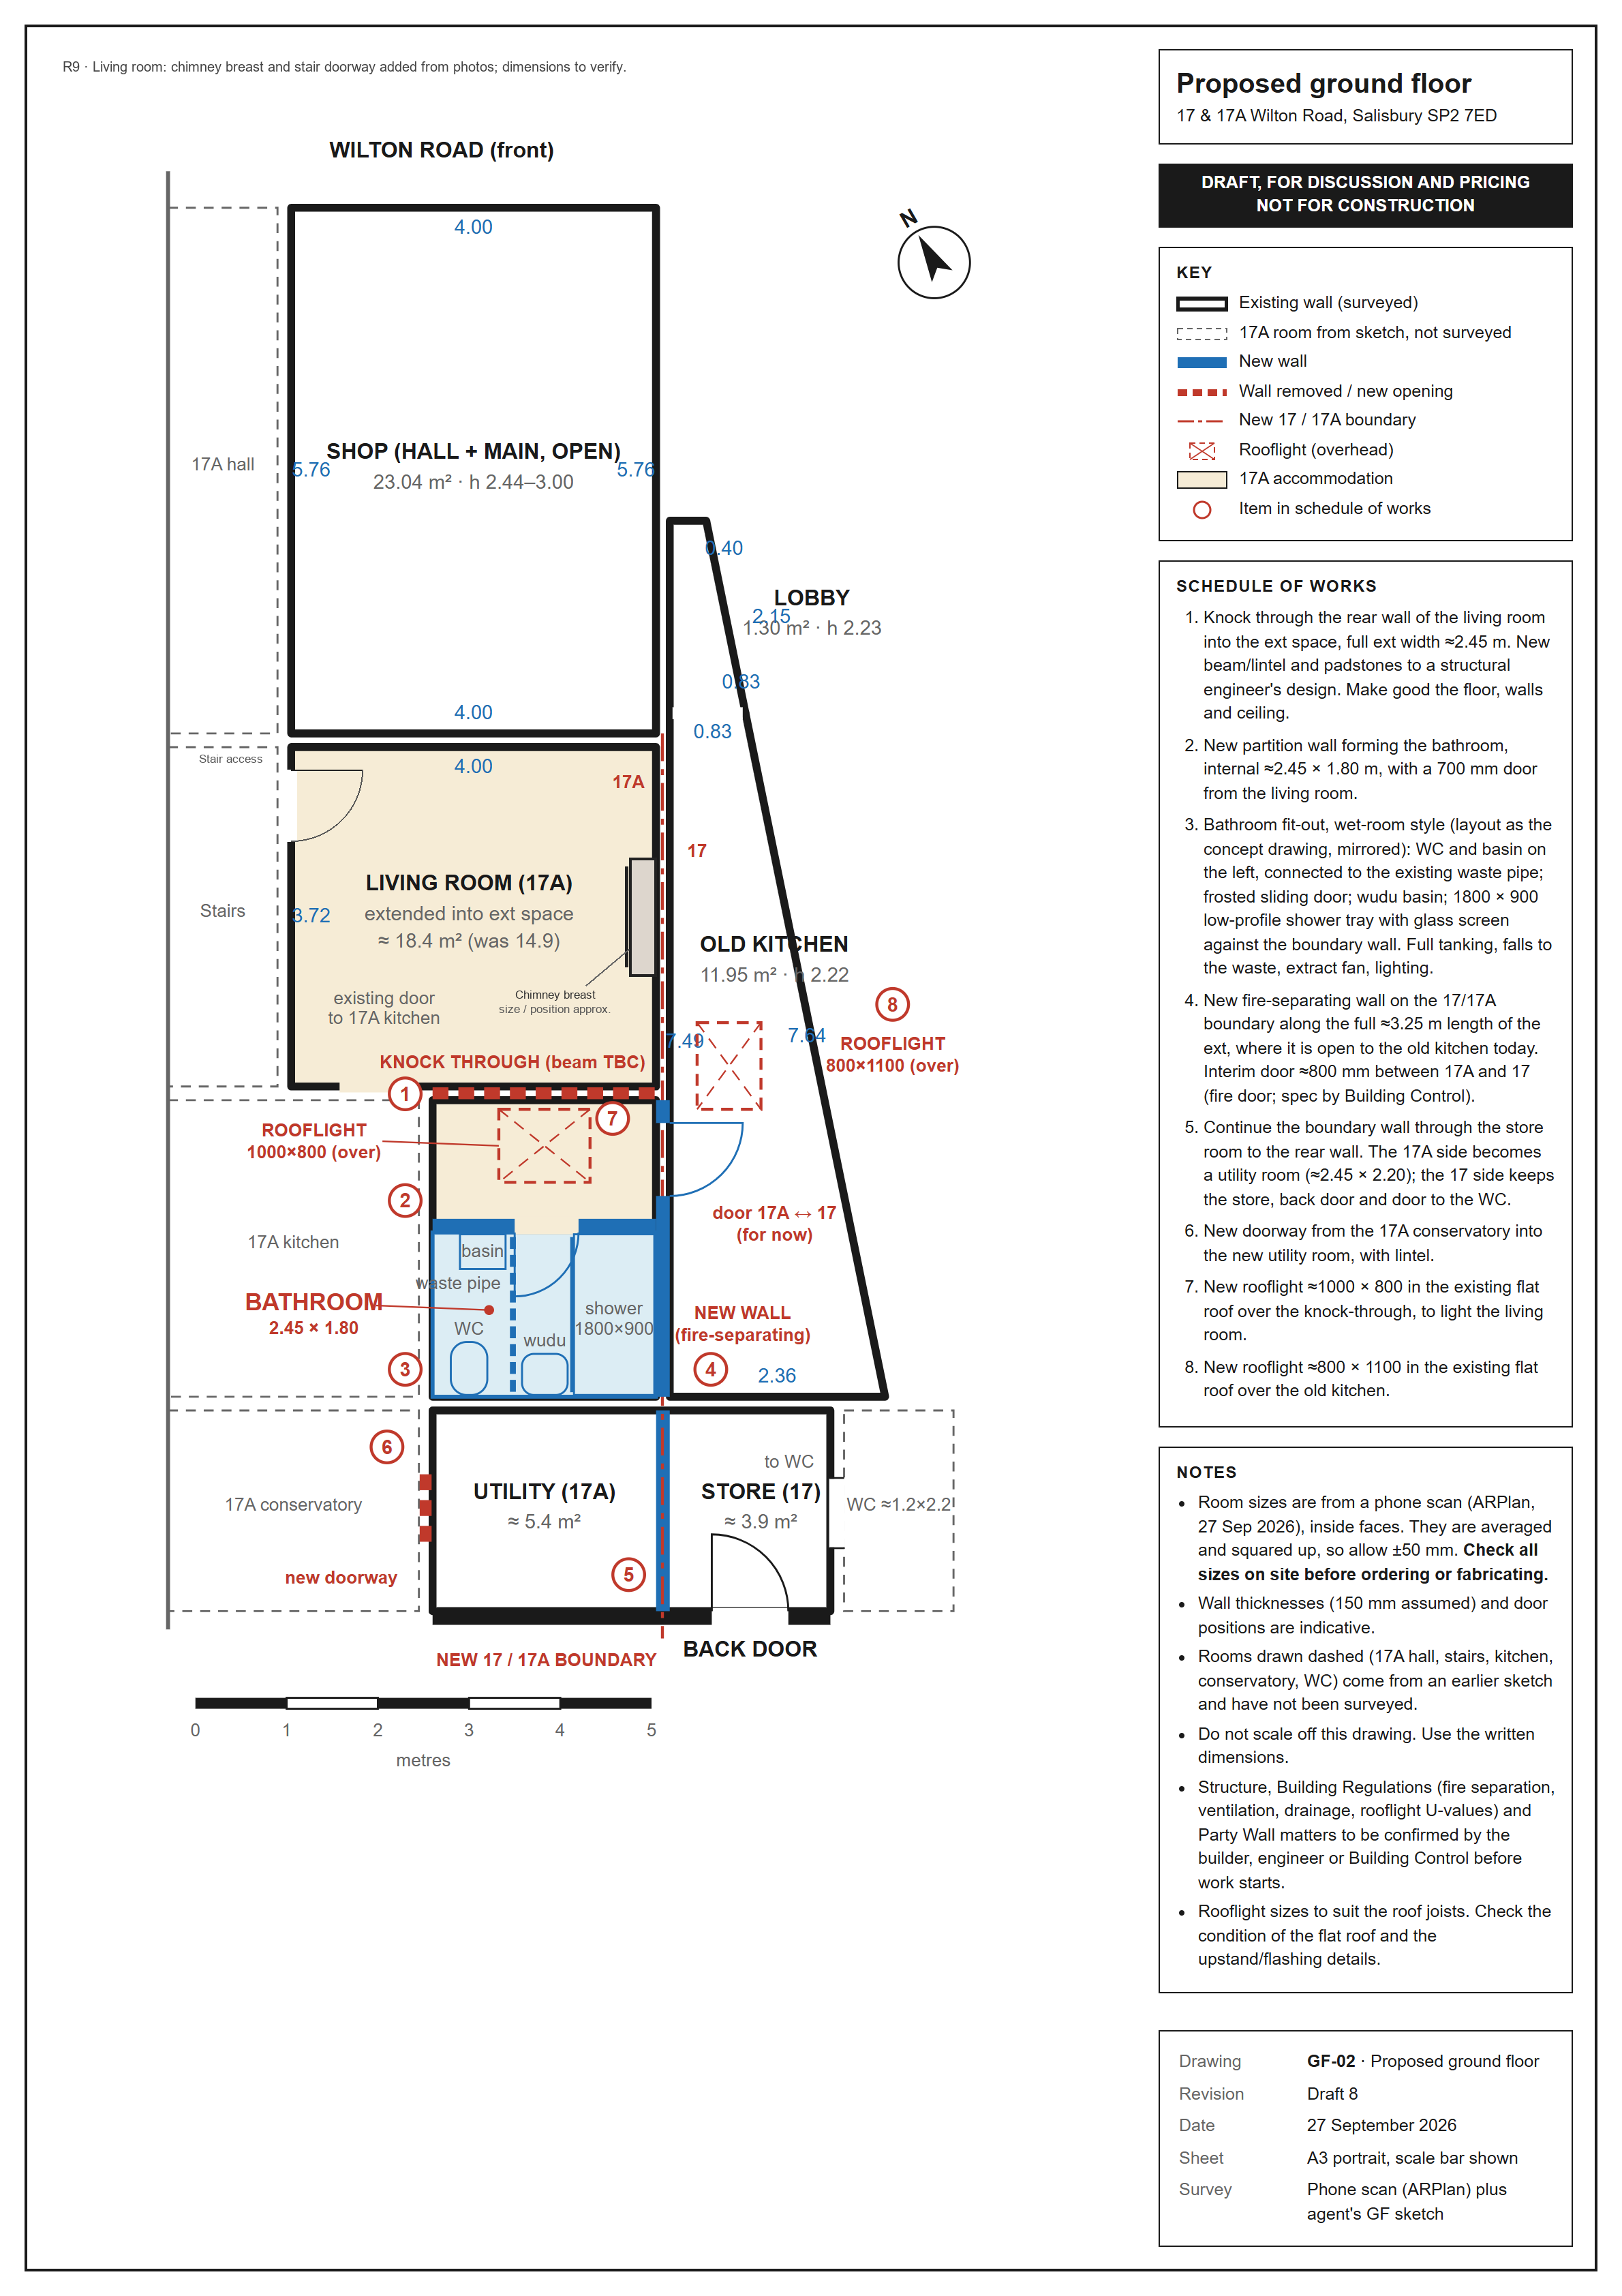
Living-room revision 9: chimney breast and stair-access doorway added from the new photographs. Their dimensions and positions are approximate and must be measured on site. Other proposed works remain as previously drawn.
Key sizes
| Space | Size (m, internal) | Ceiling | After the works |
|---|---|---|---|
| Living room (17A) | 4.00 × 3.72 | 2.42 | Knocked through into the ext space, ≈18.4 m² |
| Ext space | 2.45 wide × 3.25 deep | 2.26 | Front 1.30 m joins the living room; rear 1.80 m becomes the bathroom |
| Bathroom (new) | 2.45 × 1.80 | 2.26 | WC, basin, wudu basin, 1800 × 900 shower |
| Old kitchen (17) | 7.49 long, 0.83 → 2.36 wide (tapers) | 2.22 | Stays with 17; new wall along its 17A side |
| Store room | 4.36 × 2.20 | 2.30 | Split: 17A utility ≈2.45 × 2.20; 17 store ≈1.76 × 2.20 |
| Shop (17) | 4.00 × 5.76 | 2.44–3.00 | No work |
2. Schedule of works
Please price each item separately, using the same numbers. The bullets under each item show what we expect to be included.
- 1
Knock-through: living room into the ext space
Remove the rear wall of the living room across the full ext width (≈2.45 m opening).
- Temporary support (props/needles). New beam or lintel and padstones to a structural engineer's design. Please include the engineer's calcs or state if excluded.
- Building Control notice for the structural alteration.
- Make good the floor, walls, ceiling and reveals. The floor levels and ceiling heights differ (2.42 against 2.26), so allow for a step or bulkhead and state how you'd finish it.
- Existing door from the living room to the 17A kitchen stays.
- 2
New partition forming the bathroom
Stud wall across the ext, 1.80 m from the rear wall, giving an internal bathroom of ≈2.45 × 1.80.
- Timber or metal stud with 50 mm mineral wool for sound. Moisture-resistant boarding (see section 4).
- 700 mm internal door and frame from the living room, with a privacy lock and an undercut or vent for extract air.
- 3
Bathroom fit-out
Wet-room-style bathroom with a low-profile shower tray. Full specification in section 3.
- Left to right: WC and small basin (by the existing waste pipe), frosted sliding divider, wudu basin, 1800 × 900 shower against the boundary wall.
- Waste and water pipework, shower pump, extractor fan, lighting, wall panels, floor. See sections 3–5.
- 4
New boundary wall along the ext (17 / 17A separation)
Today the ext space is open to the old kitchen. Build a new full-height wall on the boundary line for the full ≈3.25 m length of the ext.
- This wall separates two properties. Build it as a fire-separating wall (for example blockwork, or a stud wall with fire-rated board both sides and mineral wool) to Building Control's requirements.
- Interim door ≈800 mm through this wall, just in front of the bathroom, so 17A and 17 stay connected for now. Price it as an FD30 fire door set with a self-closer, unless Building Control says otherwise.
- 5
Carry the boundary wall through the store room
Continue the same wall across the store room to the rear wall of the building.
- The 17A side becomes a utility room (≈2.45 × 2.20). The 17 side keeps the store, the back door and the door to the WC.
- Same fire-separating construction as item 4. Make good the ceiling and floor where they meet it.
- 6
New doorway from the 17A conservatory into the utility room
- Form the opening with a lintel. Door lining, architrave and a standard internal door.
- Optional: price a washing-machine supply and waste in the utility room as a separate line.
- 7
Rooflight over the knock-through
≈1000 × 800 rooflight in the existing flat roof over the front of the ext, to bring daylight into the living room.
- Size to suit the joists: trimmers if any are cut. Kerb/upstand, flashing and making good the roof covering.
- Plasterboard lining to the light well, and decoration.
- Please report the condition of the flat roof, and price re-covering it as an option.
- 8
Rooflight over the old kitchen
≈800 × 1100 rooflight in the flat roof over the wider rear half of the old kitchen. Same inclusions as item 7.
3. Bathroom specification
The layout follows the concept below, mirrored so the WC sits by the existing waste pipe. It is a compact, linear room with a walk-in shower, a wudu (ablution) basin, and a WC area behind a frosted sliding screen.
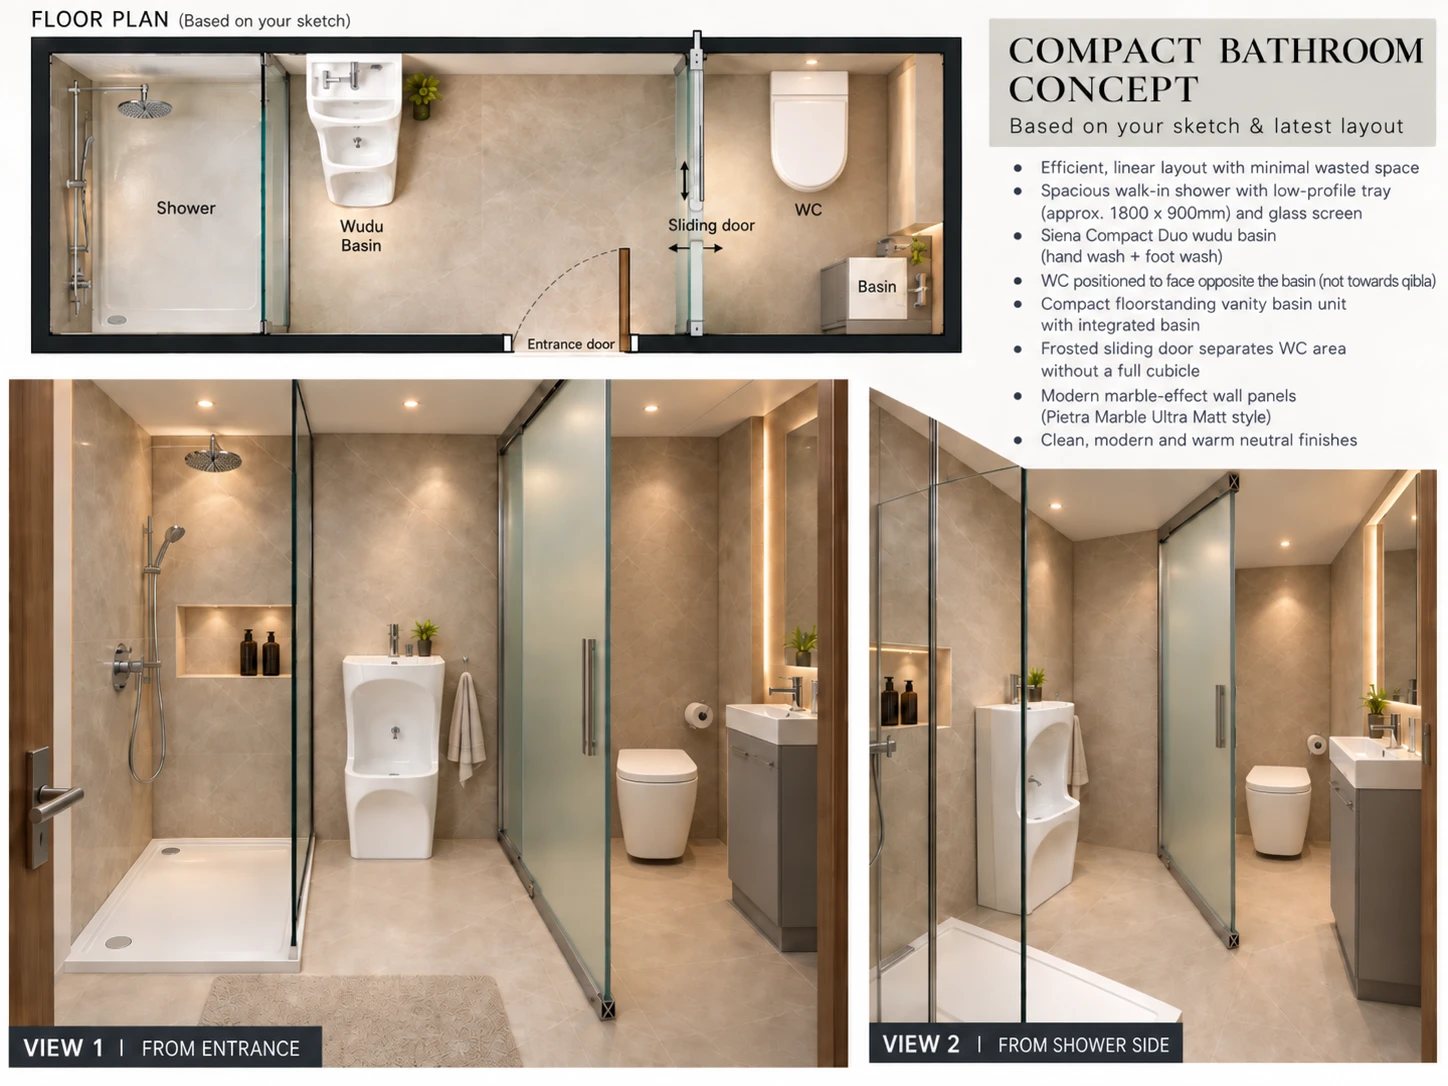
Layout (2.45 × 1.80, left to right)
- WC zone ≈0.85 m: WC against the back wall, facing the entrance side; small vanity basin opposite. Next to the existing waste pipe.
- Frosted sliding divider: separates the WC without a full cubicle.
- Entrance: 700 mm door from the living room.
- Wudu basin: on the back wall, next to the shower.
- Shower ≈0.90 m: 1800 × 900 tray running front to back, glass screen.
Ceiling height is about 2.26 m, which is low, so check the rain-head, extractor and light positions.
Fittings and products
| Item | Specification | Notes for the fitter |
|---|---|---|
| Shower tray | Sydney low-profile rectangular stone resin tray, gloss white, 1800 × 900, with waste (Bathroom Mountain) | Needs a flat, solid, level bed. Check you can get fall to the waste in the floor depth; chase into the slab or raise the tray if not. |
| Shower screen | Walk-in clear glass panel, 8 mm, with wall profile and support bar | Fix into studs or pattress, not board alone. |
| Shower valve | Thermostatic bar or concealed valve with rain head and slide rail / handset | Match the valve to the pumped gravity supply (section 5). |
| Shower pump | 2-bar twin-impeller pump, positive or universal as the tank layout requires | Hot water is gravity-fed: loft cold tank, cylinder and boiler. See section 5. |
| Wudu basin | Siena Bathrooms Wudu Compact Duo: hand/face and foot-wash unit (Modern Living Direct) | Hot and cold supply, and a waste run to the stack. Follow the maker's fixing heights. Heavy use means lots of splashing, so the wall behind needs full splash protection (section 4). |
| WC | Close-coupled or back-to-wall compact WC with soft-close seat | Connect to the existing soil/waste pipe on the left side. Confirm the pipe is a soil stack that can take a WC. |
| Vanity basin | Compact floor-standing vanity unit with integrated basin and mixer tap | Opposite the WC. |
| WC divider | Frosted (satin) glass sliding door on a top track, floor to about 2.0 m | No full cubicle. Fixed panel plus slider, fixed to a stud or pattress. |
| Wall finish | 10 mm Pietra Marble Ultra Matt shower panels (Easypanels) on all walls, floor to ceiling, with matching trims and approved adhesive/sealant | Install on the backing boards specified in section 4, following the panel maker's guide. Seal all joints and trims. |
| Floor | Slip-resistant safety flooring (for example an Altro-type wet-area vinyl) coved 100–150 mm up the walls, over a tanked screed | Water will reach the floor at the wudu basin, so treat the whole floor as a wet area, not just the shower. |
| Extractor | Humidistat or overrun fan, at least 15 l/s (Part F), ducted to outside through the wall or flat roof | Place it over the shower or wudu area. Door undercut for make-up air. |
| Lighting & electrics | IP65 LED downlights on the zoned areas, mirror light, isolator for the fan and pump | Part P notifiable. RCD protection. Keep switches outside the room or use a pull cord. |
| Extras | Shower niche in the stud wall, towel rail, toilet roll holder, mirror | Please price the towel rail (electric or plumbed) as an option. |
4. Wall & floor build-up: what goes behind the splash panels
In short: standard plasterboard is not suitable anywhere in this bathroom. Use a cement-based or waterproof backer board ("aqua board") in the wet zones, and moisture-resistant (MR) plasterboard elsewhere.
| Area | Backing | Why |
|---|---|---|
| Shower enclosure: both walls around the tray, full height, plus 300 mm past the end of the screen | Waterproof backer board: cement board (e.g. Knauf Aquapanel / Hardie Backer) or XPS board (e.g. Marmox Multiboard), 12 mm. Joints taped and tanked with a liquid membrane kit, with tanking tape into the tray upstand. | The wettest zone. If a panel joint or silicone line fails, the board and tanking keep water out of the studs. Plasterboard would soften and grow mould. |
| Wudu wall: behind and either side of the wudu basin, floor to ceiling | Same as the shower: backer board plus tanking. | Wudu involves a lot of splashing at low level (feet), several times a day. |
| WC and vanity walls | Moisture-resistant (MR, "green") plasterboard, 12.5 mm, is acceptable behind the Pietra panels. Tank the lowest 150 mm where the floor vinyl coves up. | Splashes only, not direct water. The panels protect the face, and MR board resists humidity. |
| Ceiling | MR plasterboard with a bathroom-grade paint, or a matching ceiling panel | Humidity only. Vapour check over it if the flat roof above is cold. |
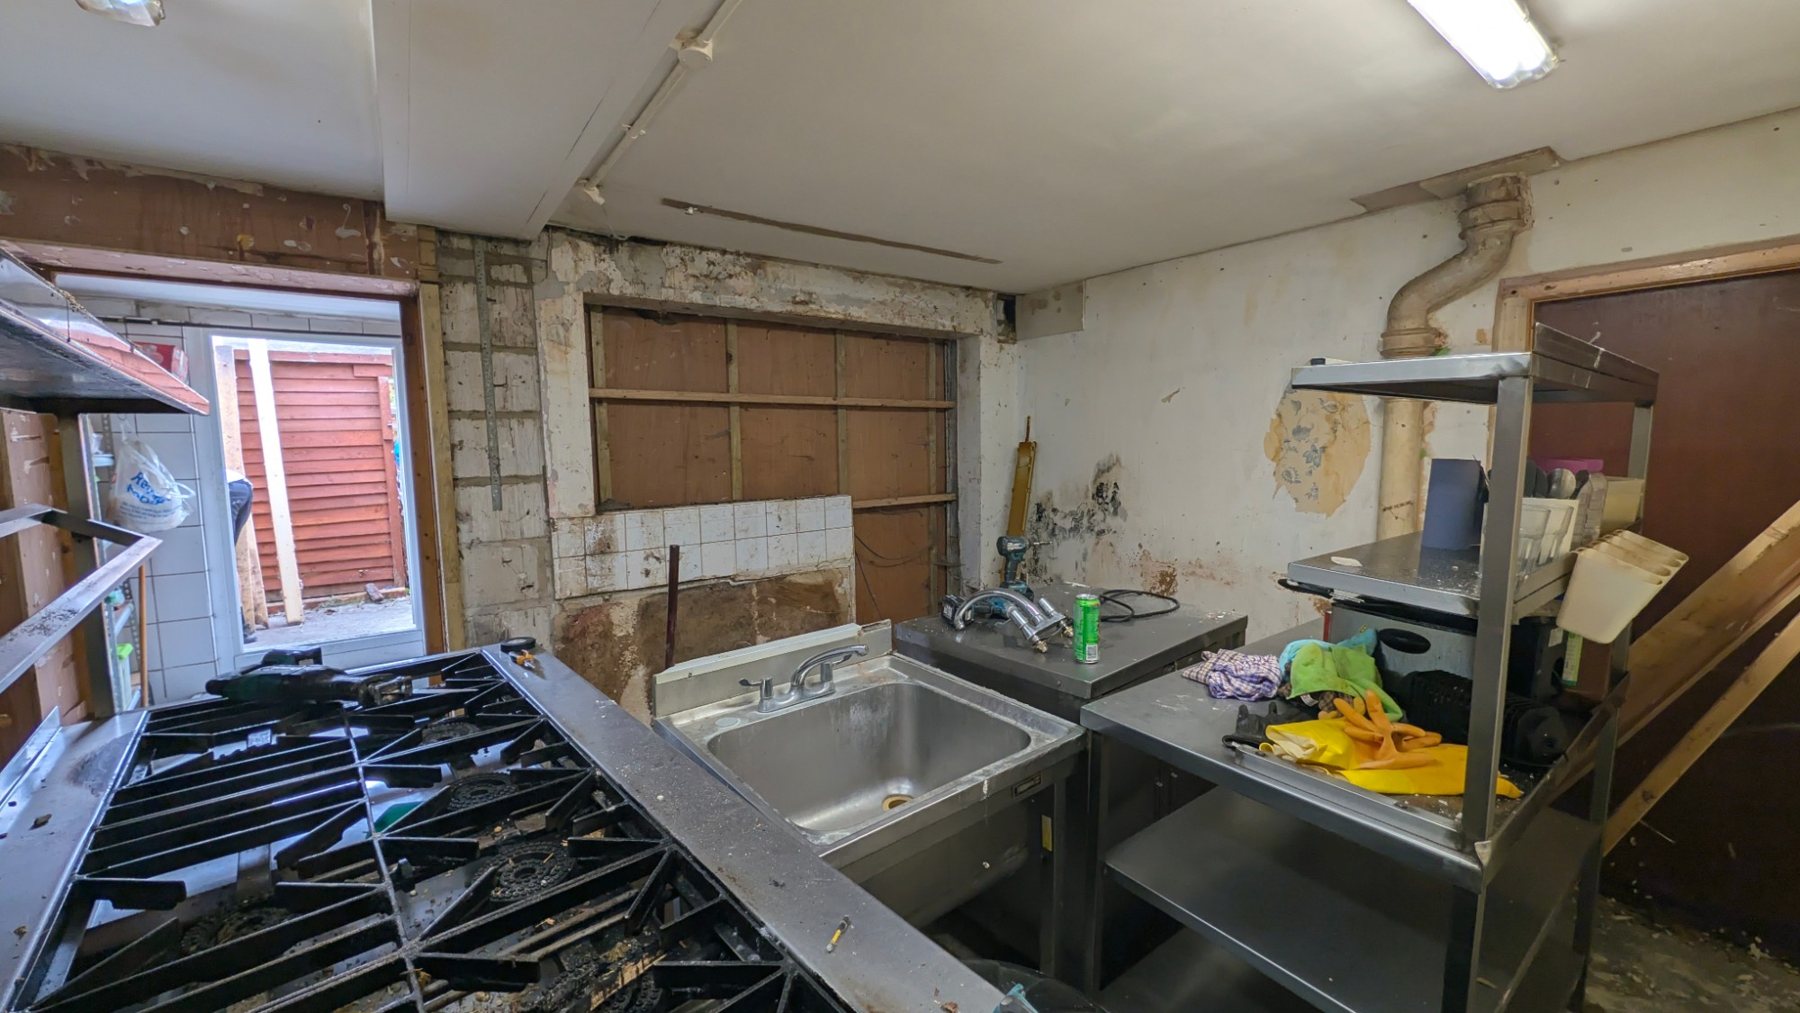
| Existing masonry walls (rear, 17A kitchen side) | Find and fix the cause of the damp first. Then treat the mould and fix backer or MR board on treated battens or with adhesive dabs. | The photos show damp and black mould on the old walls. Panels over untreated damp will fail. |
| Floor | Level screed, then a liquid tanking membrane over the whole floor, up the walls 150 mm, then safety vinyl | Water from the wudu area reaches the floor, so the whole floor must be watertight. |
5. Water supply & services
What's there now
- A gravity-fed hot water system: a large cold-water tank in the loft; a smaller cold tank on the first floor, above the hot-water cylinder; and a boiler.
- A large existing waste/soil pipe on the left side of the ext, where the WC is planned. Its size and route aren't confirmed.
- No mains-pressure hot water, so a shower pump is needed.
Please confirm and price
- Pump type and position: a 2-bar twin pump, and whether the cylinder needs a dedicated shower feed (e.g. a Surrey or Essex flange).
- Whether the existing waste pipe can take the WC, plus the wudu, basin and shower wastes with proper falls.
- Hot and cold runs to the ground-floor bathroom from the cylinder and tank.
- Extractor duct route out through the wall or the flat roof.
- Electrics: new circuit or spur for the pump, fan and lights, with Part P certification.
6. Site photos (27 September 2026, during strip-out)
The old commercial kitchen and ext space. Equipment is still in place and will be removed. Wall linings are partly stripped.
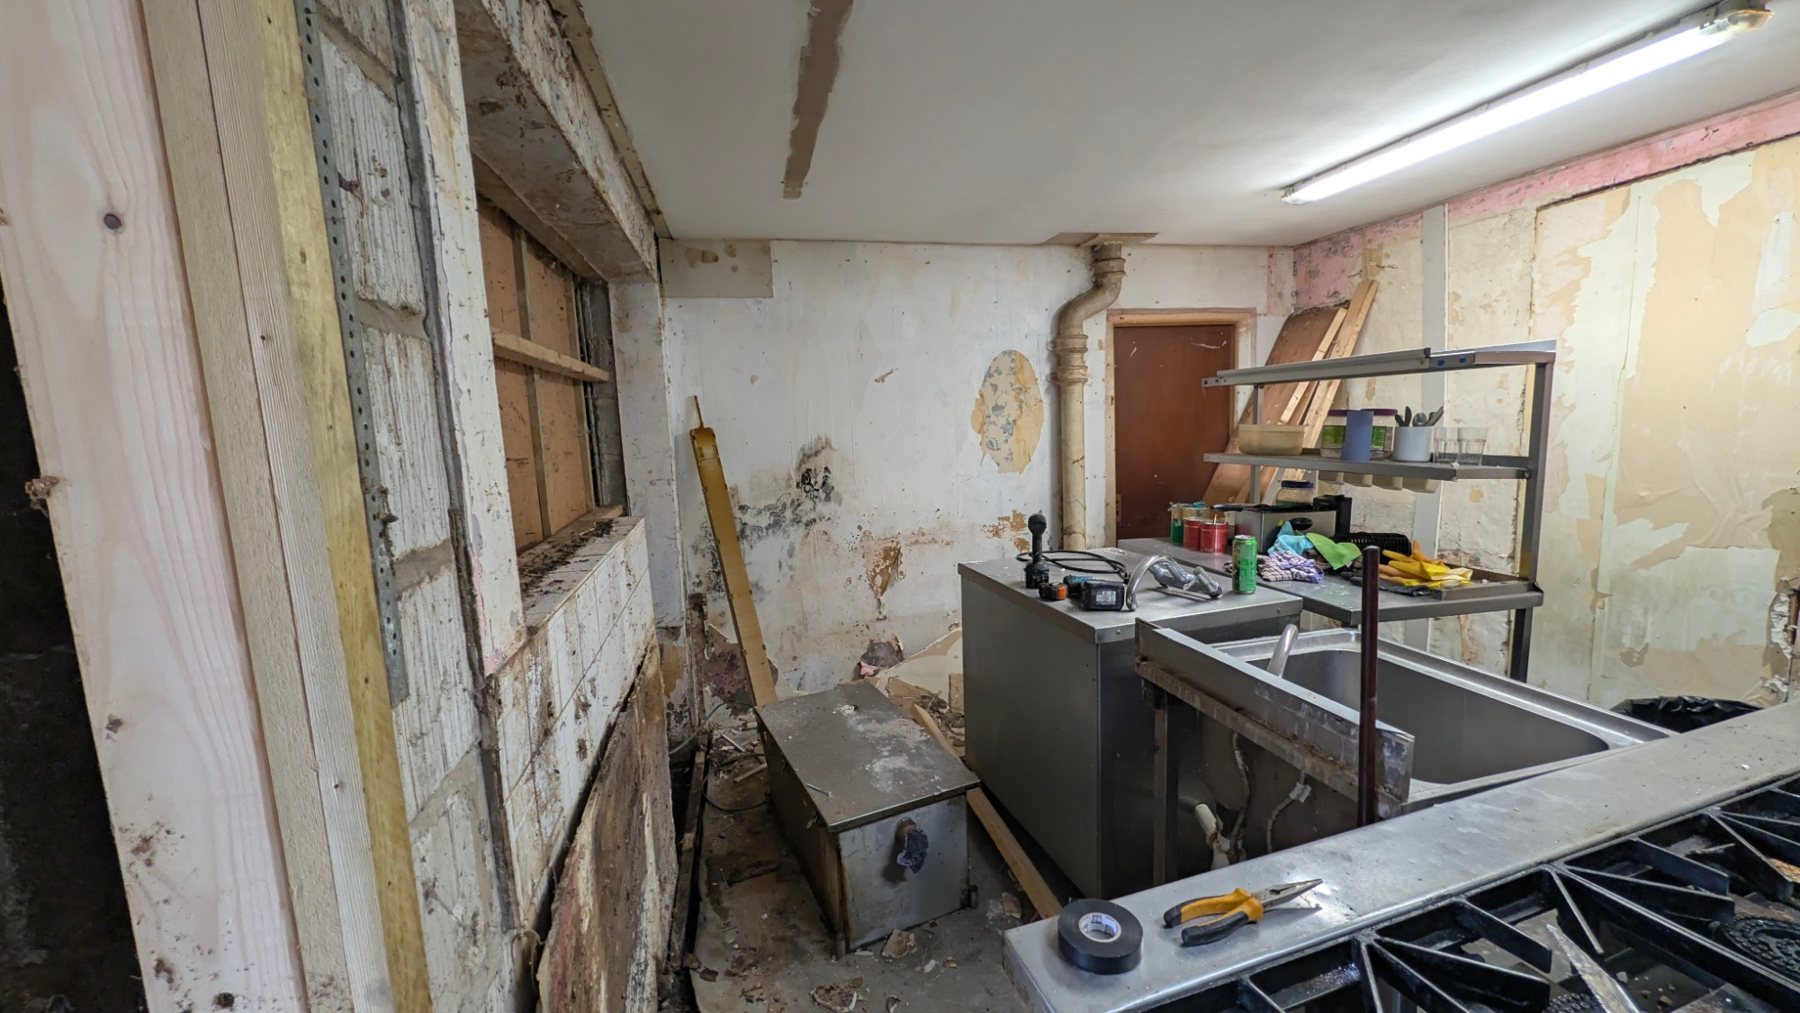
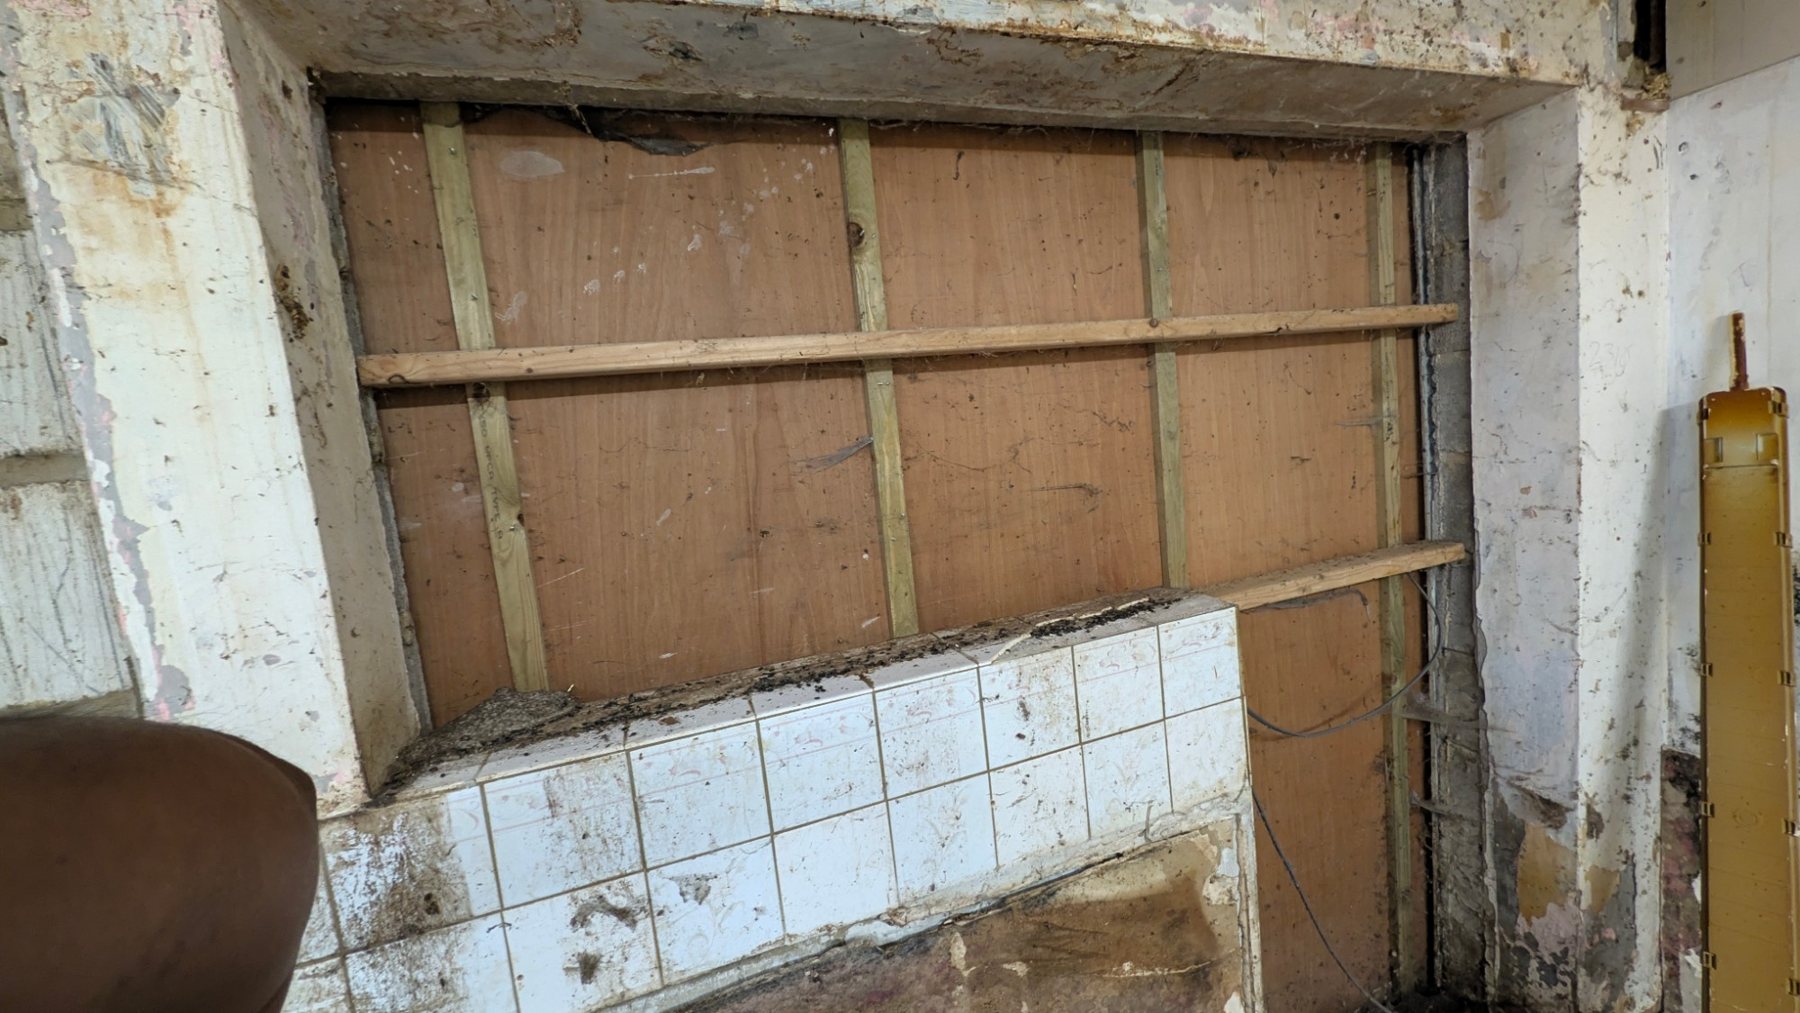
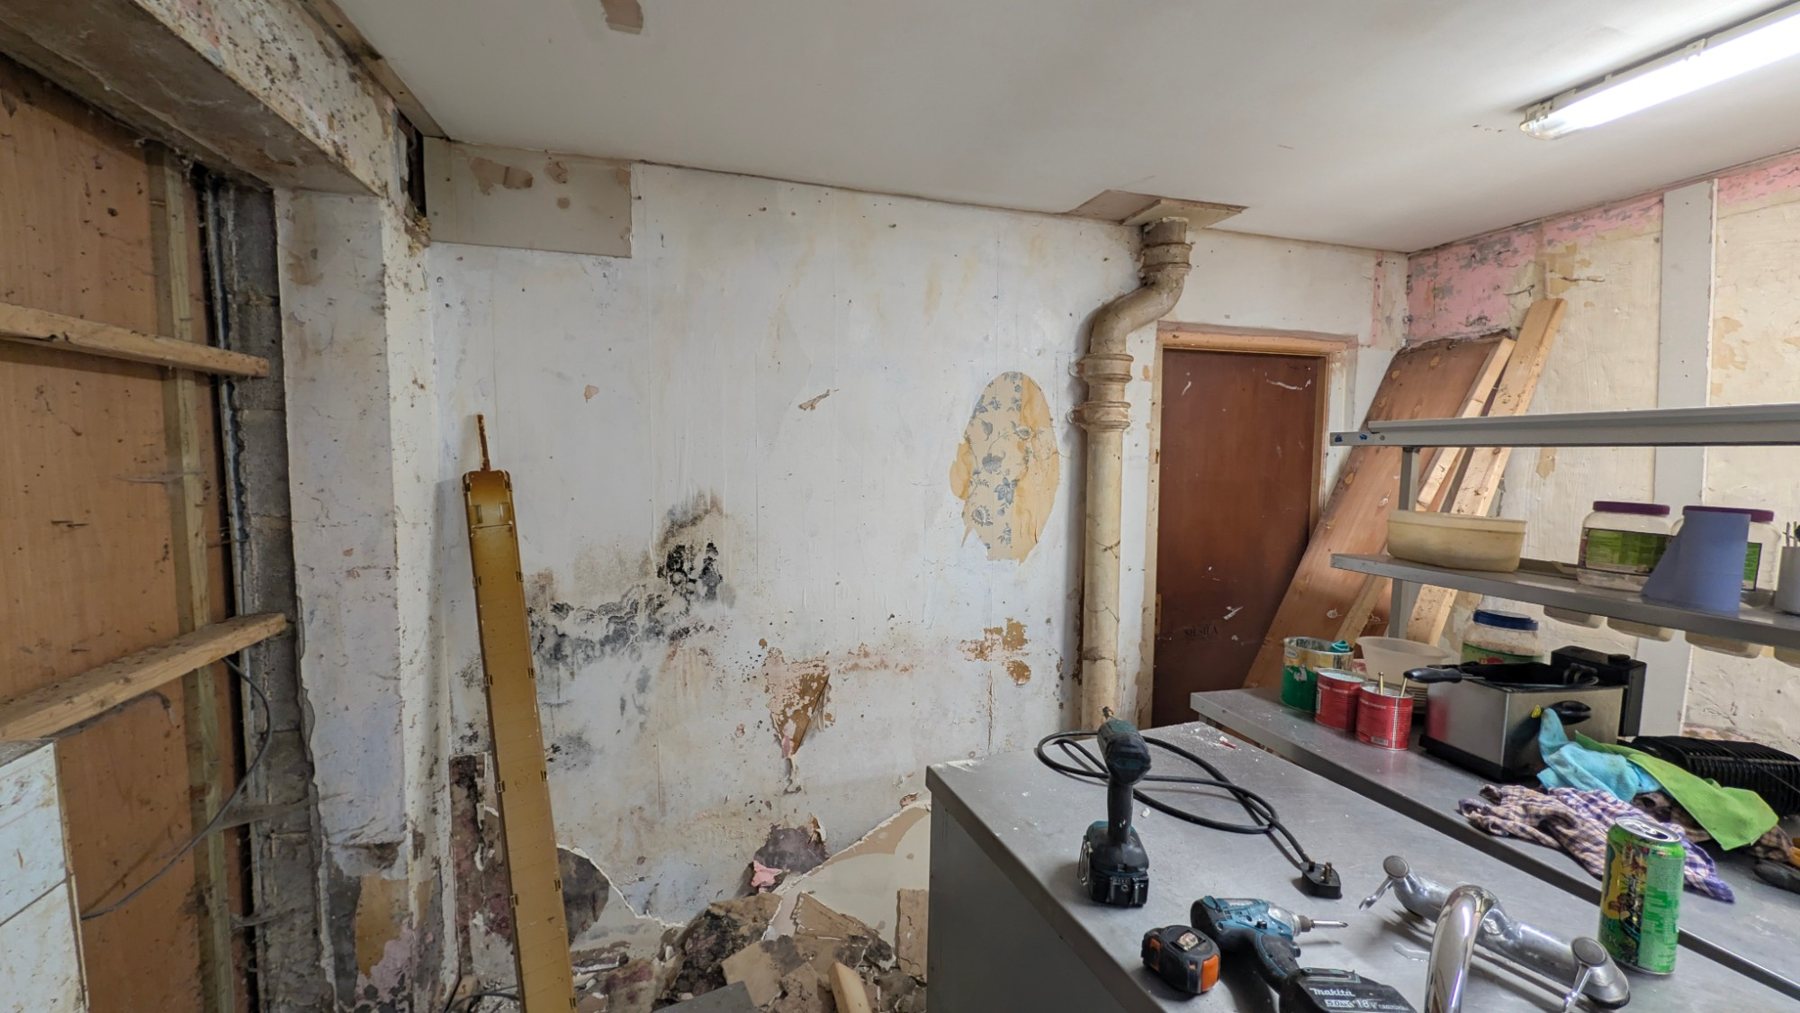
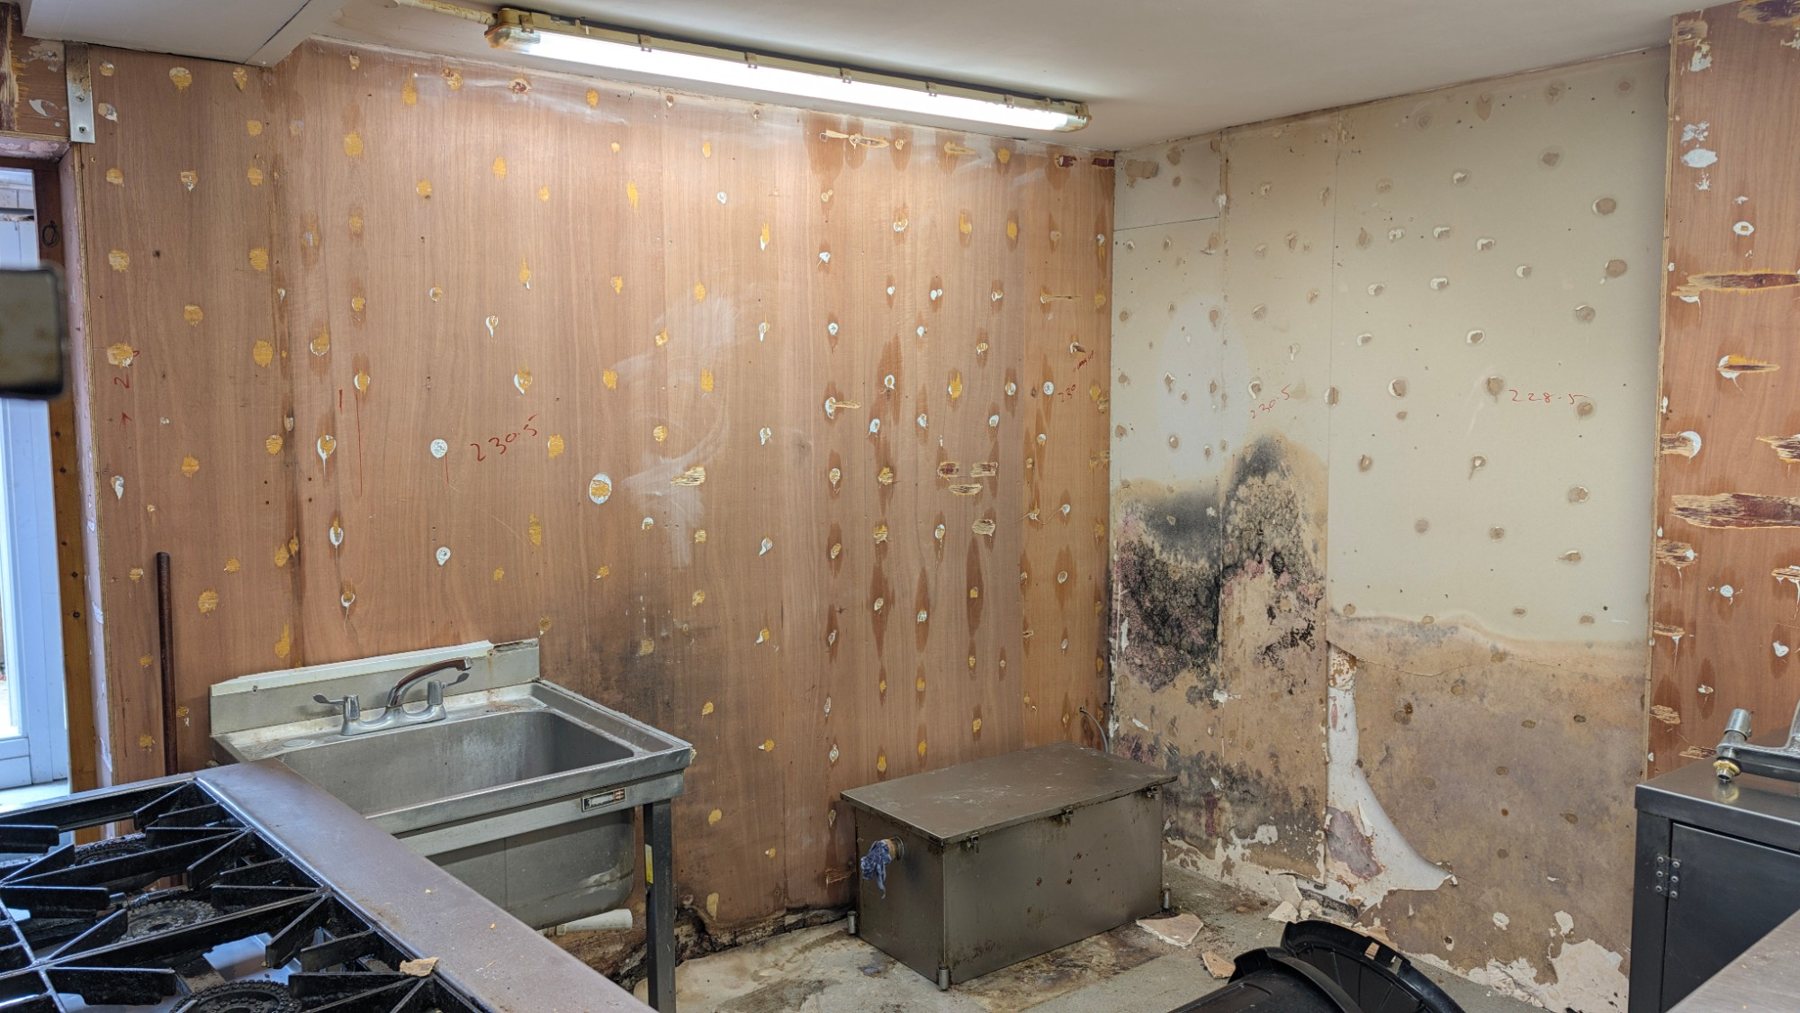
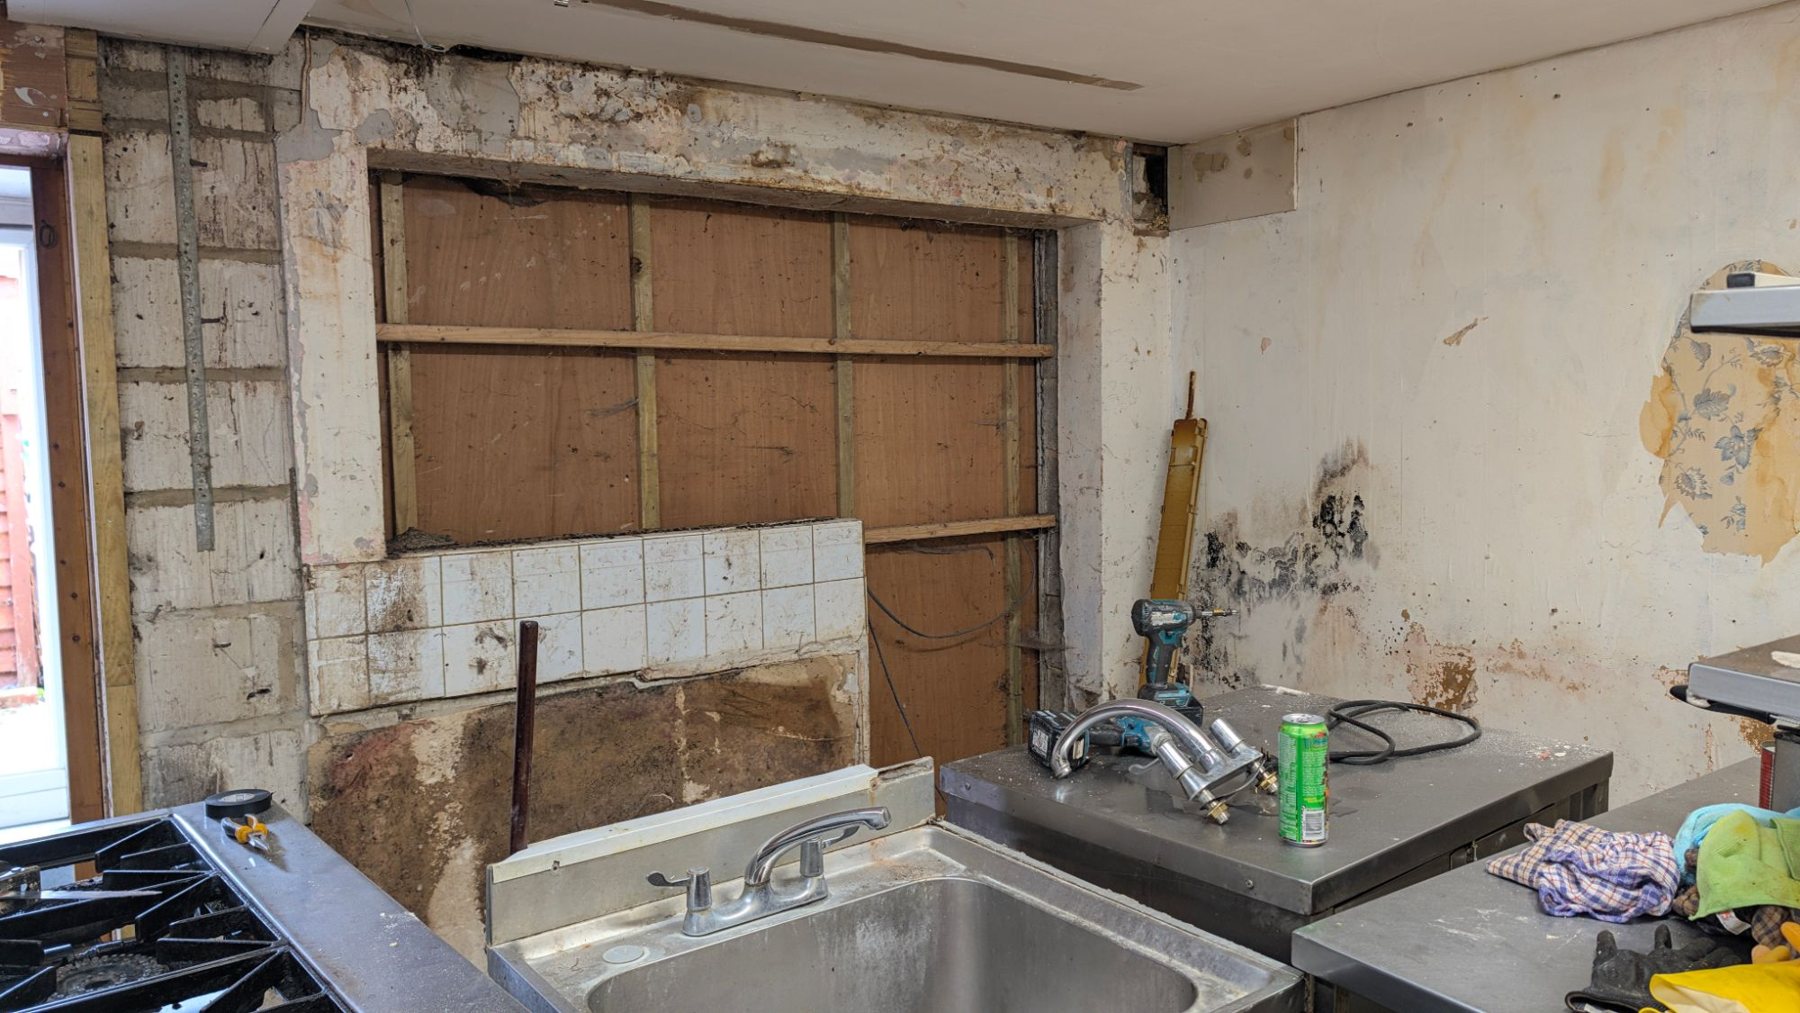
More photos and a 3D walkthrough of the existing layout are on the main page.
7. How to quote
Please include
- A price for each item 1–8, split into labour and materials.
- For the bathroom (item 3): supply and fit, and separately fit only, in case we supply the tray, wudu unit and panels ourselves.
- Structural engineer, Building Control fees and electrical certification: included, or listed as excluded.
- Strip-out of the old kitchen equipment and waste disposal (skip).
- Programme: how many weeks, the order of work, and when the bathroom is usable.
- Any assumptions, provisional sums, and anything you think we've missed.
Please check on your visit
- All key sizes (the drawings come from a phone scan).
- The wall to be knocked through: is it load-bearing, and what does it carry?
- Floor levels and slab depth for the tray waste and the wudu waste falls.
- The existing waste pipe: is it a soil stack, what size, and where does it run?
- Flat roof joist direction and spacing, and the condition of the covering at both rooflight positions.
- The cause of the damp on the old walls.